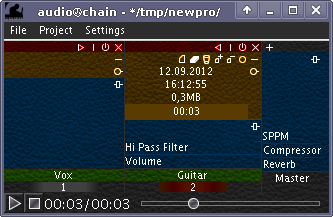
Introduction to the AudioChain mixer
An audio project loaded into the AudioChain mixer consists of several parts:
- the menu at the top, this menu is also available if there is no project loaded
- the audio playback controls and the timeline at the bottom of the mixer
- a number of audio tracks, the whole number is generally not limited
- the master track at the right side of the mixer

If you go deeper into this structure, you will see that an audio track and the master track have also several parts. The picture shows these parts in different colors (the real software is not checkered that way). Any audio track has the following sections, beginning at the top:
- colored in red: the audio track control buttons to move, hide, disable and delete the track
- colored in brown: the source audio device. The picture displays track 1 with no source audio device, the track 2 uses the recorder source audio device. The button with the circle icon lets you choose a source audio device.
- colored in blue: an area, where various audio devices can be placed
- colored in green: a field to give the track a name. Click into it and type some letters to name the tracks, if you like to distinguish them.
- not colored: a numbered button of a red or grey color at the bottom of the track. The color depends on the source audio device. Grey means, the used source audio device has no recording capabilities.
The master track has just the audio device area which is also colored in blue and at the top there is a button with a plus icon which is used to add new audio tracks to the mixer. The master track cannot be renamed since there is only one master track.
The audio track has a further, hidden area, where audio devices can be placed (remember: the blue colored area). When you select a track for recording, it changes to the capturing state. In this moment, the hidden audio device area toggles with the previously visible audio device area. Imagine as you "turn around" the audio track and you now see the "back". This back side is the recording audio device chain, while the front side is the playback audio device chain.
What is this good for? If you want to perform a recording on a track, you might want to focus on it's input level. In this case you will put an SPPM to the recording audio device chain. After recording, you might want to mix it with the volume audio device or pan it or apply a frequency filter on it. In this case you will put all these audio devices on the playback audio device chain. So the recording and playback tasks become separated in their use of audio devices.
