Getting started with AudioChain!
To create your first AudioChain project, you should have installed the software successfully. If you do not have it installed yet, follow the instructions for setup.
For this quick start tutorial, you will use an audio project template. The template enables you to start quickfully by creating predefined standard audio tracks for your new audio project. Please download this Two Track Template (right click, save as) and save it anywhere on your computer. You will use this template in the next step, when you're creating the new audio project.
Start the AudioChain software. You will see an empty mixer window with a menu only, where the file and the settings menu is active.

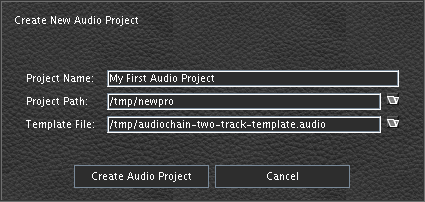
Create a new project by selecting the file menu's entry "New Project ...". A dialog "Create New Audio Project" will come up.
In the dialog are three fields for some information about the project to enter. The first field is the name of your project. Enter a name to your needs or keep it clear.
The second field is the project path on the file system. This field is mandatory and holds the information, where to store any recorded audio data for this project. You can use the file chooser to search for the desired location on your file system, by clicking on the folder icon to the right of the field. It is useful to create a new directory for each project to distinguish these from others on the file system. If you want to remove any project later, just delete it's whole directory.
The third field is an optional template file you can use to have an initial mixer setup. For this quick start tutorial, you should enter the previously downloaded template file. If you like to create your own templates, read further on project templates.

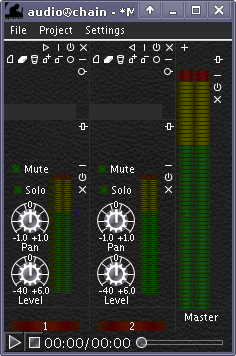
When clicking the button "Create Audio Project", you return to the audio mixer which now contains two audio tracks and one master track. At the top of the audio tracks are various icons, leave them alone for now. We will focus on recording and playback.
At the bottom of the mixer you see a start and stop button and a time line which shows a lot of zeros. The zeros are time representation in minute:second format. The time block "00:00" on the left side of the slash is the current time position, this is analogous to the position of the time slider located next to the time blocks. The time block on the right side of the slash shows the whole recorded audio length. For now there are only zeros and this means, there is no audio data recorded yet.
At the right of the mixer you will see the large peak programme meter and the word "Master" below. This hole right hand area, from the top of the mixer to the bottom, is called the master lane or master track. There is only one master track. Each of the audio tracks is resulting in this master track. The audio signals of each audio track become summarized and outputted through the master track. Imagine the way, the signal flows through the mixer, is counter clockwise, beginning at the top of the audio tracks and ending at the top of the master track. This makes AudioChain "feel" like a normal hardware mixer.
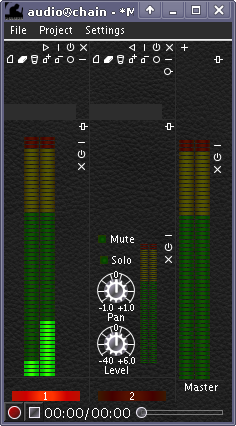
At next you will record some audio data, which is one of the main jobs of the AudioChain software. In this case there are two tracks. Each of the tracks has a red button on the bottom. This button selects a track for recording.

To select a track for recording, you can click on that red button or simply type the number on the computer's keyboard. Once a track is selected for recording, the button begins to glow. Think of this button as a light emitting diode (LED) that you have activated.
When a track is selected for recording, the audio input hardware device is capturing the audio signal immediately. Even if this captured audio data is not recorded, it becomes processed by the selected track.
Note: AudioChain auto detects a working computer hardware sound mixer for playback and recording. If you get error messages while selecting a track for recording, you might have a false recording mixer device configured. In this case you can configure the correct hardware manually at the "Audio Mixer Setting" dialog accessible through the menu "Settings".
As you might notice, the sample peak programme meter (SPPM) is enabled and flickering. This SPPM measures the level of the sampled audio data on this track. Whenever you want to record some audio data, it is very important to adjust the correct audio level. This adjustment must be done by your input device, say an instrument or a hardware mixer plugged to the computer's input jack or by the sound card driver's mixer of your operation system. For example the linux ALSA mixer or the sound card mixer of Windows or MacOS.
For digital audio signals, it is recommended to have a peak headroom of 9dB. The AudioChain SPPM has the -9dB level at the transition from the green LEDs to the yellow LEDs. So if you see a fully green SPPM when playing your instrument or vocals, the sound level is ideal for digital recording.

Once you have a good level adjusted, start the recording process by clicking the button with red circle on the left bottom or by hitting the space key on the computer's keyboard. You will see that AudioChain is recording, because the displayed time will increase and the time line will progress.
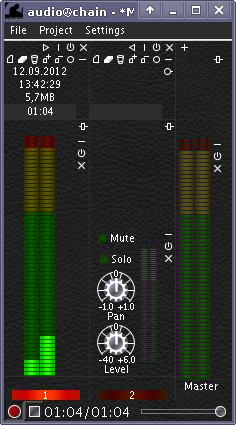
On the top of the selected track will appear a date, a timestamp, a megabyte display and an increasing time block. This area is the source device of an audio track. The project template you used while creating the project, created a recorder source device for each audio track. You might want to go deeper into this topic and read the audio devices section at a later time.
The captured audio signal will not be mixed to the output at this process. If it were mixed, it might produce an electric or an acoustic feedback, that is something you might want to avoid. If the other audio tracks contain audio data, you can listen to it while recording a new track and this is the clou of a multitrack recorder.
The recording process becomes stopped by clicking on the stop button at the bottom next to the time display, or by clicking on the red glowing LED of the selected audio track again. You can also hit the space key on the keyboard.
When the recording process has stopped, you can listen to the recorded audio data by scrolling the time line to the beginning or alternatively press the arrow-up key on the keyboard. Then press the playback button or hit the space key on the keyboard.
That's all for now. You have learned to record and playback with AudioChain. This enables you to produce a nice song. Try to record the next audio track. If you want to add new audio tracks, click the plus icon on the top of the master track. Try out the various audio devices and make a mixdown of the project. Read further on mixer introduction to learn the basic ideas beyond the mixer architecture.
